Thursday 25 October 2012

Installing SharePoint 2013 RTM - a first look

Overview: I'm installing SharePoint 2013 for a developer machine, more precisely I'm using 2 virtual machines as I want AD off my development Virtual Machine (VM) (also Azure Workflows can't be installed on the DC). This is a basic developer machine and in this post I stop once SP2013 is installed.  My setup is: SharePoint 2013 logo

  • Laptop: 32GB RAM running Windows 8 Enterprise.  I am using VMware workstation 9 for virtualisation.
  • Virtualisation: VMware workstation 9 that will host 2 VM's.  Both VM's run on Windows 2008 R2 x64.  They are fully patched/updated to today 24 Oct 2012.
  • VM1:  This is my domain controller (DC), gave the VM a static IP and performed dcpromo. Installed ADFS and rebooted the VM.  Assign 1GB RAM & 1 CPU to the VM. 
  • VM2: Created a new machine based on my patched VM windows 2008 R2image.  Renamed the VM and joined the VM onto my domain (my domain is demo.dev, I also made the IP address static).  Checked the VM can connect to the Internet.  16GB RAM 4 virtual CPU's.  100GB c drive.  BGInfo for VM2 is shown below:

Preparation for SP2013 Install:
  1. Install SQL Server 2012 on VM2 I slipstreamed with #CU2 but the current version today is #CU4.  I manual full install of SQL 2012 is perfect.  As the Cumulative Updates (CU) are aggregated/cumulative and large, only install the latest 1 that covers all the previous CU fixes
  2. Download SharePoint 2013 from TechNet or MSDN to your laptop/host.  Load the iso image for installation (includes SP1 that is needed for SP2013).  .

SharePoint 2013 Prerequisites:
1.> Run the SharePoint 2013 Enterprise RTM by running "splash.hta" to run the install wizards.
2.> On the Splash screen >Click on "Install software prerequisites".  This installs the 11 prerequisites, reboot to complete the SP2013 prerequisites install.

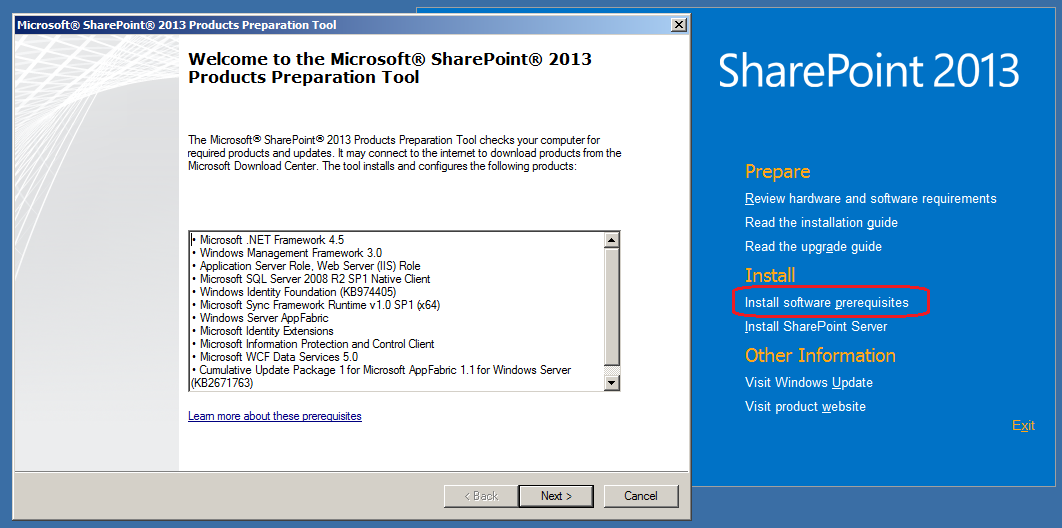
3.> After a reboot, you will continue to complete the SP2013 prerequisite install.  Once the install is complete you will see the confirmation shown below:
4.> Click "Finish" and allow the VM to reboot.

SP2013 Installation:

1.> On the Splash installation screen click > "Install SharePoint Server".  You will be prompted to enter SharePoint's licence key.
2.> Accept Microsoft's terms and conditions.  And Choose to perform the "complete" install (As per SP2010 don't install the standalone version - it's too restrictive).
3.> Close the installation wizard once the install is completed.  Select the check box "Run the SharePoint Products Configuration Wizard now" (default).

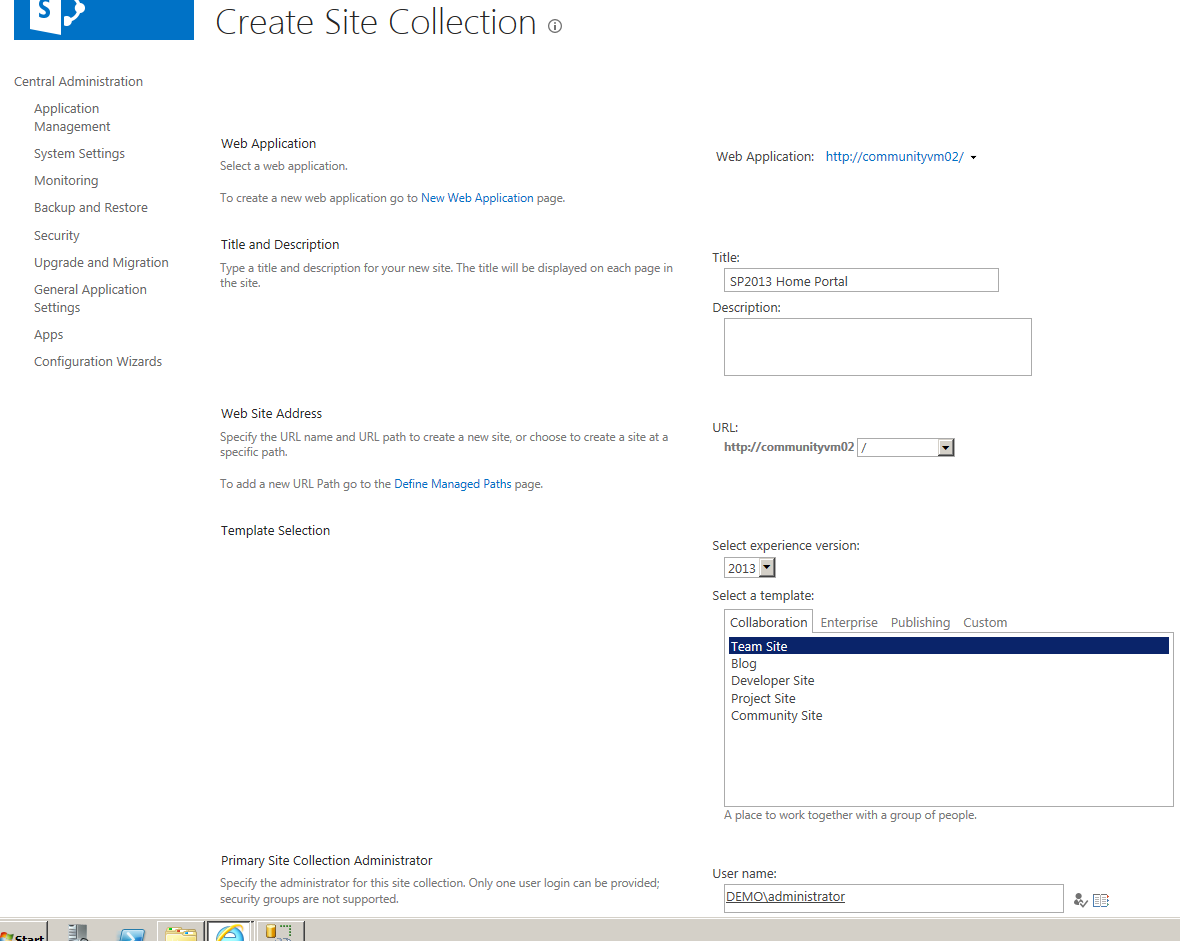
Run the SharePoint 2013 Configuration Wizard:
Follow the screen shots below through to configure the SP2013 farm on the VM.


Initial Farm Config Wizard:
1.> Select the services you want.  I took the default services which is nearly all of them so it takes awhile to provision.
2.> Ensure the Central Administration (CA) portal is accessible.
3.> Create a Site Collection (I create a Team Site on the default Web Application created during the configuration setup).

4.> Ensure the site is working.

Fin.

Summary:
This machine is perfect for looking at SP2013 features or continue building into a fully fledged developer rig (Add VS2010 and tools to build an ideal dev VM rig).  This is a simple install to get you going, for production or DTAP, you need to plan your builds to meet your needs, use multiple managed accounts and preferably script your install (gives you a documented, repeatable system setup, databases can be named clearly, far greater install control.  I'd wait for Brian Lala AutoSPInstaller to build DTAP environments if possible - AutoSPInstaller is awesome as lots of SP2010 bruised folks know.)

More Info:
Hardware & Software requirements for SP2013: http://technet.microsoft.com/en-us/library/cc262485(v=office.15).aspx
How to: Set up an on-premises development environment for apps for SharePoint: http://msdn.microsoft.com/en-us/library/fp179923(v=office.15).aspx
Must read: http://www.microsoft.com/en-us/download/details.aspx?id=30384
SP2013 Prerequisites


Wednesday 24 October 2012

SharePoint 2013 release on MSDN


SharePoint 2013 Enterprise edition is available to download through MSDN.  I was not expecting the release but on my MSDN Subscription is SharePoint 2013 for download.


All the Office 2013 products are also available.

I created a post documenting setting up SharePoint 2013 for dev/play.  This is a very basic install but shows the screens and a very simple easy setup.

Thursday 4 October 2012

VMWare workstation setup

Problem:  Occasionally I need to setup VM's on VMware workstation for development environments and I always forget the steps so this post aims to record a basic set of steps to get multiple VM's on VMware workstation 7 on a corporate network.  It works the same way for VMware 8.  This is not my area of expertise but it will hopefully help me in future and any other SharePoint dev.  This post expinas the networking when using VMware workstation 7.

Architecture Overview:  I have Windows 7 x64 on my host physical workstation with 16 GB of RAM.  I have 3 VM's in my dev environment to host VS, SP2010 & FAST.
VM1: Windows 2008 R2 that is my domain controller (1 CPU & 1GB RAM)
VM2:  Windows 2008 R2 with SQL Server 2012 Developer edition, VS 2010 SP1 Ultimate with VS SP SDK, Azure tools version 1.7, SP2010 SP1 with CU's (4 CPU's & 10 GB RAM)
VM3: Windows 2008 R2 with FAST (2 CPU's & 3GB RAM).
This architecture is good as all dev can use the clones and merely need the PC/laptop making them agnostic of the clients architecture.

Networking Summary:
(The internal networked VM's work together in a private network, the VM's can reach out to the Internet & the last step is to add access to the SharePoint websites via the network editor.

Steps:
1.> Install VMware 8 I am using version 7 as that is what my licence is (about £150) on the host.  I then built the machines explained in my "Architecture Overview" section. 
2.> Edit the network setting on VM1 (My DC).  Set the networking to NAT.
3.> Open the "Virtual Network Editor" (Hint: this is in you program files under the VMware folder).
Select the NAT networking type and click the "NAT Settings.." button.
4.> In the "NAT Settings" dialog popup window record the Gateway IP (you will use this on the VM network card IP4 network settings to give you Internet access).
5.> Power up the VM (in my scenario this is VM1 - DC) from the VMware Workstation client console.
6.> Remote into VM1.  Edit the network adaptor settings as shown below (note: that the Default gateway is the ip adr stored from the look at the "VMware network editor" in step 4.  (Hint: I use the 192.168.1.* for my IP numbers but use as you see appropriate).
7.> Open IE on VM1 and check networking is working.
8.> Optional hint:  You may need to enter proxy details on the VM.  To do this get you proxy setting from IE on the host machine.  Check you can ping the proxy (if you can't you'll need to add a hosts entry on VM1).  Open IE > Internet options > Connections tab >Lan Setting > add the proxy details.  At this powering also bypass the local urls for the proxy server (Advanced button), this allows you to access the local web sites.
9.> Repeat the same steps on the other VM's.

Setup http & rdp access fromt he corprate network.
1.> Open the "Virtual Network Editor" on the host machine.
2.> Select the NAT networking type and click the "NAT Settings.." Button.
3.> Add "Port Forwarding" setting.  The entry highlighted does http passthru to VM2 (my SharePoint VM).  You will need to also add port forward for rdp access (also ensure the VM allows remote access).

4.> Open the RDP client tool and enter the IP of the host machine and the port number you will be going to the host on (editor with translate the port)

Note: Only 1 port can be used on the host, so if you have multiple IIS instances on different VM's you can't access them simultaneously.

Wednesday 12 September 2012

Switching version settings in a document library

Overview:  I got asked a question on Document libraries which is rather obvious but I needed to check this out.  If a Document Library is set to use "Major and Minor Versions" what happens to the minor versions when you set it to only use "Major Versions".  And the answer is... Nothing.  The historic versions work as they previously did (while under the minor and major verions), when the documents are edited they will automatically now only use major versions in SharePoint.


Monday 10 September 2012

Scrum for SharePoint - Part 2

See Part 1

Technology: I am using Team Foundation Server 2012 Release Candidate.  I believe the best tools for the scrum team are offered through Visual Studio. VS 2012 has all the features and VS2010 can't do specific tasks such as create projects however I've found using VS2010 to work well.  The template used in TFS is the Visual Studio Scrum 2.0 template.   Also see http://channel9.msdn.com/Events/TechEd/NorthAmerica/2012/DEV212

Ways to work for TFS:  VS has the most comprehensive feature set for working with TFS 2012.  You can also use the TFS web UI, the SharePoint Foundation UI that is hooked up to TFS or excel and then import the data.


Creating PBI's: The screen shots use TFS2012 RC & VS2010.  I have annotated the screenshot to help with input of PBI's.  Not the priority is set from 1-1000 (default is 1000 which is the lowest priority).  I like to use Mike Cohan's planning poker (uses a relative Fibonacci sequence number to assign relative effort weight).  The scrum team vote on estimated effort after an understanding of the user story is complete.  Optional. Free tool to use for planning poker   Try this, a friend of mine built this while playing around for Scrum Poker Planning. 

The scrum master has to accept the PBI and for me to do this I need 3 pieces of information namely: the user story, acceptance criteria & additional detail short clear information such as an annotated Balsamiq mock-up.  Obviously the product owner  may negate the need for additional information but often they need to get this information from someone else in the business and I find mock-ups invaluable for clarifying to all people visual requirements.  Lastly, ensure that the team understand INVEST principles for  (Independent, Negotiable, Valuable, Estimat-able, Small, and Testable) for each User Story/Requirement.

Acceptance criteria is needed for each PBI.  This would be good to have in the Sprint planning meetings.  This is the format I recommend (gherkin language).
Scenario:
  Given
  When
  Then

An example I have is
Scenario: Employee requests leave
  Given an employee has sufficient leave available in the year
  When the employee schedules leave (holiday)
  Then the employee is informed his request is valid and his manager is informed of the request.

Acceptance Criteria – “What is Acceptance Criteria? Put simply, it's the criteria that defines what "Done" means for each PBI. Acceptance Criteria is critical to the success of a Scrum team, as it becomes the handshake between the Product Owner and the team -- it helps define what the team is committing to.”  http://www.nomad8.com/files/acceptance_criteria.php
"Pre-established standards or requirements a product or project must meet" Google's definition of acceptance criteria.
Normally acceptance criteria focuses on functional user stories but you also need to cover NFR's such as performance.  Negative acceptance criteria is often overlooked when creating AC's and do the AC's before development starts, you can always change them later.
An alternative to Gherkin for writing the acceptance criteria is to use checklists to ensure the User Story does what the business stakeholder wants and the developer has developed it correctly.

(Story Board)

The TFS 2012 Scrum template provides a good overview of the current sprint.  Team favorites are dropped from TFS queries to provide useful insights into the project.


Key Meetings:

1. Daily Stand-up (max 15 minutes):  I like to perform these at about 10:00 every day in the morning.  Each person tells the group: done/achieved in the past 24 hrs, what they are doing in the next 24 hours and brings up any blockers/obstacles/impediments.  I like to take notes as the scrum master and as the team falls into place.  I let team members run the daily stand-up scrum meeting in random turns once we all know how to do them and it seems to work well with communications in the team and I take summarized notes and I use the format:  Date, Time, Attendees, Each attendee summary & general meeting notes:  e.g. Adam and Paul were late for the meeting, blockers were not recorded, Kanban board was not updated....
Rules: Start at 10:00, be concise (part items that are taking to long and get the people to talk after the meeting), all participants to stick to the format: last day, today and blockers.  It always ends at 10:15 and leave the area.  Listen to the appoint meeting scrum master and they need to stop ongoing discussions.

2. Demo Meetings:  Date, time, attendees & roles, problems & suggestions.  Do at the end of sprint, tend to be 30 minutes to 90 minutes per demo each sprint. 

3. Sprint Review Meeting: Done at the end of a sprint cycle after the sprint is over.  Ensure each PBI is reviewed.  Often used with demos to validate each PBI and this allows the Product Owner to evaluate the PBI's fulfillment and make changes if necessary.  Important but can be skipped by the whole team as long as the PO does it and is happy.

4. Sprint Retrospective Meeting: Optional meeting to identify improvements that can be made.  I use this meeting after the Sprint Review at the end of the 1st 2 or 3 sprints and then only periodically as the project progresses.  Tip: Use the format: Glad, sad, bad game.  https://app.scatterspoke.com for managing Retrospectives.  An alternative is to the approach: What went well, What didn't and What needs to happen.


I've seen many different formats for running retrospectives, and a good default option for me is "mad, glad, sad". I also like the Danish baking Retrospective that I saw recently.  
Azure Devops Danish Baking Retrospective Board

A nice feature I was shown recently was to "Include a Team Assessment".  I'd use it every 3-4 sprints assuming we are using 2 week sprints, the results are a great indicator of confidence and the teams position.
Team Assessment in DevOps Retro board 

5. Sprint Planning Meeting:  Have a sprint goal.  Done at the start of the sprint cycle.  The scrum team and the product owner identify items from the product backlog to go into the sprint.  The last part of the meeting is to create a sprint backlog to implement each item selected from the product backlog.  I also like to have a grooming of stories in the previous sprint to ensure the whole team know what is likely to come along and tech can feedback to the PO/stakeholders.

Agile for SharePoint
Scrum for SharePoint - Part 1
Scrum for SharePoint - Part 2 (This Post)
Scrum - Part 3 - Scaling Scrum
Scrum - Part 4 - Kanban and Scrum
Scrum - Part 5 - Certification PSM 1

Sunday 1 July 2012

Azure Web Sites

Overview:  I love Azure.  There is just so much we can now do and a new feature released in June 1012.  The "web sites" function in Windows Azure (WA) are extremely flexible and this post shows how you can create a website using various templates in my case a Joomla CMS web site complete with a My SQL database.

There are a lot of options for using Azure web sites such as creating your own web sites in Visual Studio and uploading them to the Web Site role (all for free).  In this post I'm looking at leveraging a CMS to create a web site.  Windows Azure offers up to 10 free web site roles.  There are a lot of templates in the gallery so I feel this is a great place for design agencies and small business that need commercial web sites such as CMS, blogs ect.  They even have the WordPress template.

Steps to get Joomla working:
You will need a Windows Azure (WA) account, you get a free 90 day trial and if you hook your MSDN to it you get a decent amount of extra cloud computing hours thrown in. But for the 10 free "web sites" you don't use your cloud hours - it's free!

Once you are logged into the portal click the Add (+ button on the bottom left of the screen to add new services.  In this case select "Web Site" > "From Gallery" as show below.
Select the "CMS" tab and in my case I chose the "Joomla" template.
 Add the site name and login credentials as prompted (you can add a CName record later).
 The web site is created that backs onto my MySQL database.
Check the url and build your site.
Summary:  Web sites in Azure are easy, they are backed up by MS, there are tons of templates or build your own options, it free.  Microsoft is adding functionality and new services to Azure quickly and is easy to use.    

Scrum for SharePoint - Part 1 Introduction

Overview: Scrum is an Agile methodology that is useful for SharePoint projects as it allows for discovery/refinements of requirements as opposed to formally knowing all the functional requirements of a system upfront.  Each project lends itself to specific methodologies however, an Agile approach is often more suitable for SharePoint projects.  For larger, more formal projects I like MSF but traditional SDLC methodology run projects also work well.  Scrum is one Agile methodology and probably the most commonly used.  As with all projects I recommend following a methodology but lend from other and take out what isn't working to get the optimal process.

Scrum for Dummies:  Scrum consists of 3 types of team roles: the product owner/s, scrum master and the rest are team members.  Tam sizes should be less than 7-8 people (if bigger use scrum of scrums).
1.) The Product Owner is responsible for creating user stories.  These are specified in the form: As the <role> , I want to <feature> so that <benefit>.
2.) From the User stories I create Product Backlog Items (PBI's), Scrum is broken up into sprints (usually 2-4 weeks).  The sprint kicks off with a Sprint planning meeting that involves the entire team.  PBI's are broken down into tasks, tests and bugs.  During the sprint planning, the team members commit (renamed to forecasting in 2016) to the PBI's in the sprint and creates a "Sprint Goal".  I usually set apart 3-4 hrs to complete the Sprint Planning session at the start of each sprint.
3.) Daily scrum meeting takes 15 minutes facilitated by the scrum master.  Each team member states what they accomplished in the last day, what they will be working on in the next day and any blockers.  When the team members start a discussion, shelve it and they can have a separate meeting outside the scrum to avoid over running on the scrum meeting.  Do scrum meetings standing it helps make the sprint/team finish on time.
4.) At the end of each sprint, there must be a potential deployment.  Hold a scrum retrospective, this is to work out the team velocity (are the PBI's and features being achieved) and work out how productivity can be improved.
5.) Documentation:  Scrum is not document intensive but aims to get features right not finish at a specific point.  The documents generated by scrum are:
5.1) User Stories and corresponding Acceptance Criteria
5.2) Meetings (Daily scrum minutes/decisions, sprint planning agreements/outcomes & retrospective minutes)
5.3) Whiteboards (architecture diagrams and user story refinement)
5.4) TFS recorded data 
5.5) Communications (emails about decisions, supporting information, this could also include pptx from presentations, user reviews).

TFS:
  • SharePoint has a lot out of the box and using Scrum allows for better technical decisions whereby team members often identify OOTB solutions which hopefully eradicates the common developer mentality of using .NET to do existing SP functionality.
  • There are Templates for Scrum download and base your project off them.
  • Microsoft offer a great free services called TFSPreview (http://www.tfspreview.com/) which is a SaaS offering TFS 2010, doesn't have all the features but it is amazing and best of all it has a built in Scrum template so I'd always start with this and if you feel you are being to restricted you can always go for a on premises option. VSTS (cloud service) is the current name for TFS preview Oct 2017.

Agile for SharePoint
Scrum for SharePoint - Part 1 (This post)
Scrum for SharePoint - Part 2
Scrum - Part 3 - Scaling Scrum
Scrum - Part 4 - Kanban and Scrum
Scrum - Part 5 - Certification PSM 1