Friday 26 October 2012

SQL 2012 Slipstreamed Installation

Overview:  I like automation.  I use AutoSPInstaller for SharePoint even on developer VM's and taking this further I want to automated SQL installations.  This post explains how to installed SQL Server 2012 on a domain controller.  Sure it's not a good idea but I want a standalone development machine for SharePoint 2013 Preview.

 Once SQL Server 2012 is installed via the PowerShell completing, verify SQL is accessible.
 Thanks to Wayne Senior for the PowerShell scripts.

Thursday 25 October 2012

Installing SharePoint 2013 RTM - a first look

Overview: I'm installing SharePoint 2013 for a developer machine, more precisely I'm using 2 virtual machines as I want AD off my development Virtual Machine (VM) (also Azure Workflows can't be installed on the DC). This is a basic developer machine and in this post I stop once SP2013 is installed.  My setup is: SharePoint 2013 logo

  • Laptop: 32GB RAM running Windows 8 Enterprise.  I am using VMware workstation 9 for virtualisation.
  • Virtualisation: VMware workstation 9 that will host 2 VM's.  Both VM's run on Windows 2008 R2 x64.  They are fully patched/updated to today 24 Oct 2012.
  • VM1:  This is my domain controller (DC), gave the VM a static IP and performed dcpromo. Installed ADFS and rebooted the VM.  Assign 1GB RAM & 1 CPU to the VM. 
  • VM2: Created a new machine based on my patched VM windows 2008 R2image.  Renamed the VM and joined the VM onto my domain (my domain is demo.dev, I also made the IP address static).  Checked the VM can connect to the Internet.  16GB RAM 4 virtual CPU's.  100GB c drive.  BGInfo for VM2 is shown below:

Preparation for SP2013 Install:
  1. Install SQL Server 2012 on VM2 I slipstreamed with #CU2 but the current version today is #CU4.  I manual full install of SQL 2012 is perfect.  As the Cumulative Updates (CU) are aggregated/cumulative and large, only install the latest 1 that covers all the previous CU fixes
  2. Download SharePoint 2013 from TechNet or MSDN to your laptop/host.  Load the iso image for installation (includes SP1 that is needed for SP2013).  .

SharePoint 2013 Prerequisites:
1.> Run the SharePoint 2013 Enterprise RTM by running "splash.hta" to run the install wizards.
2.> On the Splash screen >Click on "Install software prerequisites".  This installs the 11 prerequisites, reboot to complete the SP2013 prerequisites install.

3.> After a reboot, you will continue to complete the SP2013 prerequisite install.  Once the install is complete you will see the confirmation shown below:
4.> Click "Finish" and allow the VM to reboot.

SP2013 Installation:

1.> On the Splash installation screen click > "Install SharePoint Server".  You will be prompted to enter SharePoint's licence key.
2.> Accept Microsoft's terms and conditions.  And Choose to perform the "complete" install (As per SP2010 don't install the standalone version - it's too restrictive).
3.> Close the installation wizard once the install is completed.  Select the check box "Run the SharePoint Products Configuration Wizard now" (default).

Run the SharePoint 2013 Configuration Wizard:
Follow the screen shots below through to configure the SP2013 farm on the VM.


Initial Farm Config Wizard:
1.> Select the services you want.  I took the default services which is nearly all of them so it takes awhile to provision.
2.> Ensure the Central Administration (CA) portal is accessible.
3.> Create a Site Collection (I create a Team Site on the default Web Application created during the configuration setup).

4.> Ensure the site is working.

Fin.

Summary:
This machine is perfect for looking at SP2013 features or continue building into a fully fledged developer rig (Add VS2010 and tools to build an ideal dev VM rig).  This is a simple install to get you going, for production or DTAP, you need to plan your builds to meet your needs, use multiple managed accounts and preferably script your install (gives you a documented, repeatable system setup, databases can be named clearly, far greater install control.  I'd wait for Brian Lala AutoSPInstaller to build DTAP environments if possible - AutoSPInstaller is awesome as lots of SP2010 bruised folks know.)

More Info:
Hardware & Software requirements for SP2013: http://technet.microsoft.com/en-us/library/cc262485(v=office.15).aspx
How to: Set up an on-premises development environment for apps for SharePoint: http://msdn.microsoft.com/en-us/library/fp179923(v=office.15).aspx
Must read: http://www.microsoft.com/en-us/download/details.aspx?id=30384
SP2013 Prerequisites


Wednesday 24 October 2012

SharePoint 2013 release on MSDN


SharePoint 2013 Enterprise edition is available to download through MSDN.  I was not expecting the release but on my MSDN Subscription is SharePoint 2013 for download.


All the Office 2013 products are also available.

I created a post documenting setting up SharePoint 2013 for dev/play.  This is a very basic install but shows the screens and a very simple easy setup.

Thursday 4 October 2012

VMWare workstation setup

Problem:  Occasionally I need to setup VM's on VMware workstation for development environments and I always forget the steps so this post aims to record a basic set of steps to get multiple VM's on VMware workstation 7 on a corporate network.  It works the same way for VMware 8.  This is not my area of expertise but it will hopefully help me in future and any other SharePoint dev.  This post expinas the networking when using VMware workstation 7.

Architecture Overview:  I have Windows 7 x64 on my host physical workstation with 16 GB of RAM.  I have 3 VM's in my dev environment to host VS, SP2010 & FAST.
VM1: Windows 2008 R2 that is my domain controller (1 CPU & 1GB RAM)
VM2:  Windows 2008 R2 with SQL Server 2012 Developer edition, VS 2010 SP1 Ultimate with VS SP SDK, Azure tools version 1.7, SP2010 SP1 with CU's (4 CPU's & 10 GB RAM)
VM3: Windows 2008 R2 with FAST (2 CPU's & 3GB RAM).
This architecture is good as all dev can use the clones and merely need the PC/laptop making them agnostic of the clients architecture.

Networking Summary:
(The internal networked VM's work together in a private network, the VM's can reach out to the Internet & the last step is to add access to the SharePoint websites via the network editor.

Steps:
1.> Install VMware 8 I am using version 7 as that is what my licence is (about £150) on the host.  I then built the machines explained in my "Architecture Overview" section. 
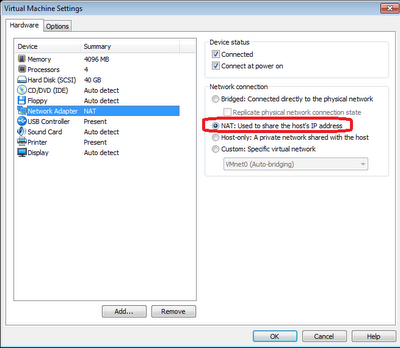
2.> Edit the network setting on VM1 (My DC).  Set the networking to NAT.
3.> Open the "Virtual Network Editor" (Hint: this is in you program files under the VMware folder).
Select the NAT networking type and click the "NAT Settings.." button.
4.> In the "NAT Settings" dialog popup window record the Gateway IP (you will use this on the VM network card IP4 network settings to give you Internet access).
5.> Power up the VM (in my scenario this is VM1 - DC) from the VMware Workstation client console.
6.> Remote into VM1.  Edit the network adaptor settings as shown below (note: that the Default gateway is the ip adr stored from the look at the "VMware network editor" in step 4.  (Hint: I use the 192.168.1.* for my IP numbers but use as you see appropriate).
7.> Open IE on VM1 and check networking is working.
8.> Optional hint:  You may need to enter proxy details on the VM.  To do this get you proxy setting from IE on the host machine.  Check you can ping the proxy (if you can't you'll need to add a hosts entry on VM1).  Open IE > Internet options > Connections tab >Lan Setting > add the proxy details.  At this powering also bypass the local urls for the proxy server (Advanced button), this allows you to access the local web sites.
9.> Repeat the same steps on the other VM's.

Setup http & rdp access fromt he corprate network.
1.> Open the "Virtual Network Editor" on the host machine.
2.> Select the NAT networking type and click the "NAT Settings.." Button.
3.> Add "Port Forwarding" setting.  The entry highlighted does http passthru to VM2 (my SharePoint VM).  You will need to also add port forward for rdp access (also ensure the VM allows remote access).

4.> Open the RDP client tool and enter the IP of the host machine and the port number you will be going to the host on (editor with translate the port)

Note: Only 1 port can be used on the host, so if you have multiple IIS instances on different VM's you can't access them simultaneously.